Loading in corpora
In order to use the analysis functions in PCT, you’ll first need to open up a corpus. There are four possible ways of doing this: first, you can use a built-in corpus (a small, entirely invented sample corpus or the Irvine Phonotactic Online Dictionary of English [IPHOD]; second, you can use a corpus that is independently stored on your local computer; third, you can create a new corpus from text; and fourth, you can import a spontaneous speech corpus (e.g. from Praat TextGrids or from your own local copy of a corpus such as the Buckeye corpus [BUCKEYE] or TIMIT corpus [TIMIT]. Each of these will be discussed in turn. The basic structure of a corpus, however, is a list of words with other possible information about each: e.g., its transcription, its frequency of occurrence, its lexical category, its syllable structure, etc. These are in columnar format; e.g., loaded from a CSV or tab-delimited text file.
Using a built-in corpus
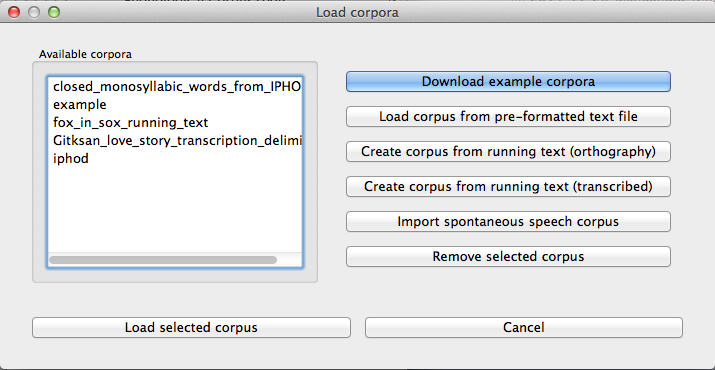
To use a built-in corpus, simply go to the “Corpus” menu and select “Load corpus...” from the list, which will open the “Load corpus” dialogue box.
The first time you want to use a built-in corpus, you’ll need to download it (from a Dropbox link accessed by PCT internally); you must therefore be connected to the internet to complete this step. To do so, click on “Download example corpora” from the right-hand menu. This will allow you to download either the Example corpus and/or the IPHOD corpus [IPHOD]. Note that the version of the IPHOD corpus that is contained here has been altered from the freely downloadable version, in that it (1) does not have the derived columns and (2) has been re-formatted as a .corpus file for easy reading by PCT. It also contains only the following information: word, transcription, and token frequency (from the SUBTLEX corpus [SUBTLEX]). Please note that if you use the IPHOD corpus, you should use the following citation (see more on citing corpora and functions of PCT in Citing PCT and the algorithms used therein):
Vaden, K. I., Halpin, H. R., Hickok, G. S. (2009). Irvine Phonotactic Online Dictionary, Version 2.0. [Data file]. Available from http://www.iphod.com/.
After the corpus has been downloaded, it appears in the lefthand side of the “Load Corpus” dialogue box. Simply select the corpus and click on “Load selected corpus” at the bottom of the dialogue box. Once these corpora have been downloaded once, you don’t have to do so again; they will be saved automatically to your local system unless and until you delete them. On subsequent loadings of the PCT software, you will still see these corpora listed in the lefthand side of the “Load Corpus” dialogue box, as in the following diagram:
The example corpus and the included version of the IPHOD corpus include phonetic transcriptions in IPA, and are by default interpreted either using the feature system of [Mielke2012], which in turn is based on SPE features [SPE] [this is the default for the example corpus], or using the feature system suggested by [Hayes2009] [this is the default for the IPHOD corpus]. These systems are fully functional for doing subsequent analyses. Note, however, that this is a built-in functionality of these particular corpora, and does not allow you to use SPE or Hayes features with other corpora. To use SPE features with other corpora, or to change the feature system associated with a built-in corpus, you’ll need to download the actual feature files, as described in Working with transcriptions and feature systems. Features can be used for defining classes of sounds (e.g., creating separate tiers for different types of segments) and for defining environments (e.g., the environments in which segments might occur, for use in calculating their predictability of distribution).
The corpus may take several seconds to load, but will eventually appear; the following is the example corpus:
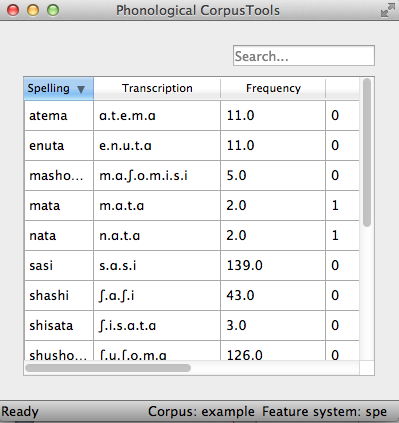
Note that the name of the corpus and the current feature system are shown at the bottom right-hand corner of the screen for easy reference. Summary information about a corpus gives more detail on how to find out summary information about your corpus. Typing a word or part-word in the “search” box takes you to each successive occurrence of that word in the corpus (hit “return” once to see the first instance; hit “return” again to see the second, etc.). Note that the “search” box searches only the “Spelling” column of the corpus. To do a phonological search, please use the “Phonological search” function under the “Corpus” menu (see detailed discussion in Phonological Search).
Using a custom corpus
It is also possible to use a custom corpus, i.e., any corpus that is in the appropriate format (see Required format of corpus) and stored independently on your computer. Before doing so, it may be helpful to first load the appropriate feature system into PCT, so that the transcriptions in your corpus can be interpreted; detailed instructions for doing this are given in Working with transcriptions and feature systems. It is also possible to load the feature system after you’ve loaded the corpus.
To use a custom corpus, click on “Corpus” / “Load corpus...” and then choose “Load corpus from pre-formatted text file.” Then, enter the path for the corpus or select it using “Choose file...” and navigating to it from a system dialogue box. Enter a name for the corpus and indicate what the delimiter type is; the default is a comma (,); enter t if the file is tab-delimited. Any symbol can be used; PCT will simply break elements at that symbol, so whatever symbol is used should be used only to delimit columns within the corpus. Finally, if there is a column in the corpus that shows phonetic transcription, choose which feature system you would like to use. As noted above, in order for there to be feature systems to choose from, you must first have loaded them into PCT (Working with transcriptions and feature systems).
Clicking “OK” in the “Load new corpus” dialogue box returns you to the “Load corpus” dialogue box, and you will see that the new corpus has been added to your list of available corpora. Select this new corpus and choose “Load selected corpus” to open it in PCT.
Required format of corpus
In order to use your own corpus, it must have certain properties. First, it should be some plain text file (e.g., .txt, .csv); it cannot, for example, be a .doc or .pdf file. The file should be set up in columns (e.g., imported from a spreadsheet) and be delimited with some uniform character (tab, comma, backslash, etc.). The names of most columns of information can be anything you like, but the column representing common spelling of the word should be called “spelling”; that with transcription should be called “transcription”; and that with token frequency should be called “frequency.” All algorithms for doing corpus analysis will assume these column names. If, for example, you were using a corpus that had different frequency columns for total frequency vs. the frequency of occurrence of the word in its lowercase form (cf. the SUBTLEX corpus), then whichever column is to be used for token frequency calculations should simply be labelled “frequency.”
Creating a corpus from running text
It is also possible to have PCT create a corpus for you from running text, either in orthographic or transcribed form. If the text is orthographic, of course, then segmental / phonological analysis won’t be possible, but if the text is itself transcribed, then all subsequent analysis functions are available.1 As with pre-existing corpora, it may be helpful to first load the relevant feature system into PCT, so that the transcriptions in your text can be interpreted; detailed instructions for doing this are given in Working with transcriptions and feature systems (note that the corpus can be loaded in without featural interpretation, and features added later).
To create a corpus from text, click on “Corpus” / “Load corpus...” and then select either “Create corpus from running text (orthography)” or “Create corpus from running text (transcription).”
- File selection: Select the name of the plain .txt file by entering the path directly or choosing the file using a system dialogue box, by clicking on “Choose file....”
- Name of corpus: Indicate what the name of the corpus should be; PCT will default to the name of the original .txt file.
- Word delimiter: Enter the character used to delimit words in the corpus (e.g., a space).
- Punctuation: If there is punctuation in the text, indicate which elements should be ignored. Ignoring punctuation allows PCT to compile an accurate count of unique words; for example, the words “example” and “example,” should be treated as two tokens of the same word, ignoring the comma at the end of the second one. Punctuation can be included, however; this might be desirable in a case where a punctuation symbol is being used within the transcription system (e.g., [!] used for a retroflex click).
- Corpus for transcriptions: If the corpus is an orthographic one, but you have a separate corpus that includes both orthographic and trancribed representations of the words, you can have PCT automatically look up all of the transcribed words in the separate corpus (e.g., you’re uploading a new transcribed corpus of English, but want to look up the transcriptions in IPHOD). Select the other corpus from the dropdown menu; if you haven’t loaded the corpus into PCT already, this option is not available. Indicate using the check box whether case (capitalization) should be ignored (e.g., if your corpus contains the name “Bud,” PCT will look for an exact match, “Bud,” unless case is ignored, in which case, the common noun “bud” will be accepted as a pronunciation source).
- Transcription and feature selection: If the corpus is a transcribed one, you can select the transcription and featural system, if these systems have already been loaded into PCT (see also discussion in Working with transcriptions and feature systems). You can also indicate what the delimiter is for units of transcription (if there is such a delimiter). See the note below for details.
- A note about complex transcriptions: There is no way for PCT to know
automatically when a single sound is represented by a sequence of
multiple characters – e.g., that the digraphs [aɪ], [th], [xw], [p’],
[tʃ], and [iː] are intended to represent single sounds rather than
sequences of two sounds. There are currently three possible ways of
ensuring that characters are interpreted correctly:
- One-to-one transcriptions: The first way is to use a transcription system with a one-to-one correspondence between sounds and symbols, such as DISC. If you need to create a novel transcription system in order to accomplish this (e.g., using [A] to represent [aɪ] and [2] to represent [th], etc.), you may certainly do so; it is then necessary to create a novel feature file so that PCT can interpret your symbols using known features. See detailed instructions on how to do this in Downloadable transcription and feature choices. The word tide in American English might then be transcribed as [2Ad]. This is a relatively easy solution to implement by using find-and-replace in a text editing software, though it does result in less easily human-readable transcriptions.
- Delimited transcriptions: The second way is to use a standard transcription system, such as IPA, but to delimit every unitary sound with a consistent mark that is not otherwise used in the transcription system (e.g., a period). Thus the word tide in American English might be transcribed in IPA as [.th.aɪ.d.], with periods around every sound that is to be treated as a single unit. When creating the corpus, PCT will give you the option of specifying what the character is. PCT will then read in all elements between delimiting characters as members of a single “segment” object, which can be looked up in a standard feature file (either an included one or a user-defined one; see Using a custom feature system). This solution makes it easy to read transcribed words, but can be more labour-intensive to implement without knowledge of more sophisticated searching options (e.g., using regular expressions or other text manipulation coding) to automatically insert delimiters in the appropriate places given a list of complex segments. A first pass can be done using, e.g., commands to find “aɪ” and replace it with “.aɪ.” – but delimiters will also have to be added between the remaining single characters, without interrupting the digraphs.
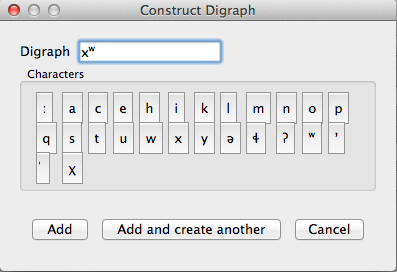
- Constructed digraphs: The third option is to tell PCT what the set of digraphs is in your corpus manually, and then to have PCT automatically identify these when it creates the corpus. In the “Create corpus from running text (transcription)” dialogue box, there is an option to “Construct a digraph.” Once you have entered the path name of the file you are creating the corpus from, PCT will scan it for single characters and present these to you as options for constructing digraphs from. For example, in the following box, all of the single characters in a Gitksan text file are presented, and can be selected sequentially to create the appropriate digraphs. This method is somewhat more labour-intensive in terms of knowing ahead of time what all the digraphs are and being able to list them, but ensures that all such occurrences are found in the text file. Note, however, that if there’s a distinction to be made between a sequence of characters and a digraph (e.g., [tʃ] as a sequence in great ship vs. as an affricate in grey chip), this method will be unable to make that distinction; all instances will be treated as digraphs.
- Create corpus: Once the options have been selected, click on “Create corpus.” The columns created are: individual lexical items (words), their raw token frequency in the corpus, and their relative token frequency (raw token frequency / total tokens in the corpus).
- Use the corpus: Once the corpus has been created, it also now appears in your list of corpora in the “Load corpus” dialogue box. Simply select it and choose “Load selected corpus” to open it for use in PCT.
- Save the corpus: The corpus itself will automatically be saved for use on subsequent re-openings of PCT, without needing to be created again. It can be exported as a .txt file and saved to a location of your choosing, however, for use in spreadsheets or with other software. Once the corpus has been created and loaded, simply go to “Corpus” / “Export corpus as text file...” to save it using a system dialogue box.
The following shows an example of a transcribed Gitksan story transformed into a (small!) corpus (with grateful acknowledgement to Barbara Sennott and the UBC Gitksan language research group, headed by Lisa Matthewson & Henry Davis, for granting permission to use this text):
- The original transcribed story:

- The transcription delimited with periods to show unitary characters:

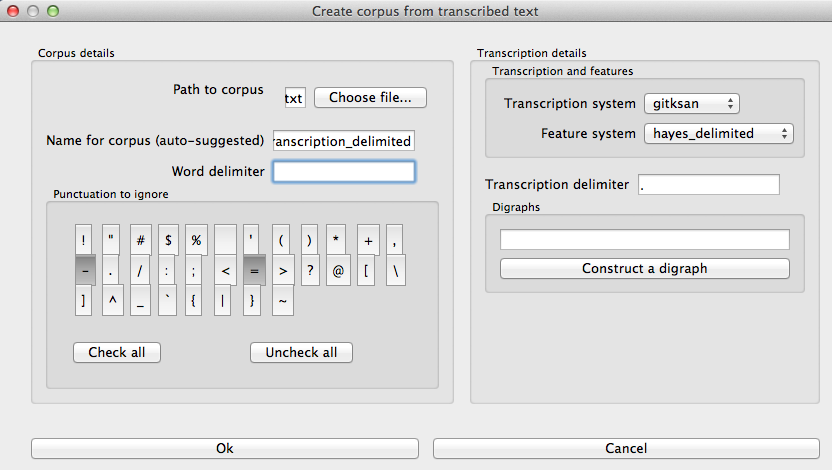
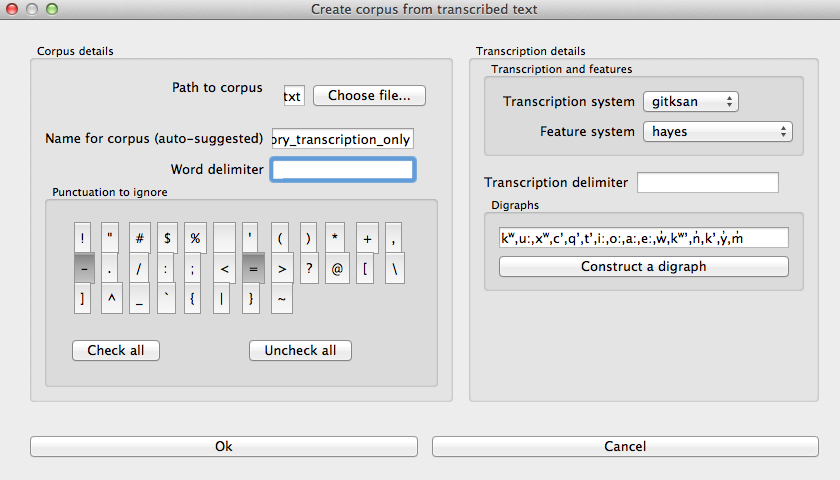
3. The dialogue box for creating the corpus from text. Note that hyphens and equal signs, which delimit morphological boundaries in the original, have been ignored during the read-in. A space is entered into the word delimiter box (not visible here). The period is selected as the transcription delimiter. A feature system called gitksan2hayes_delimited, which maps the delimited transcription system used in this example to the features given in [Hayes2009], has already been loaded into PCT (see Using a custom feature system), and so is selected here.
Alternatively, the same corpus could be read in without being hand-delimited, by constructing digraphs within the load corpus dialogue box, as follows:
- The resulting corpus, ready for subsequent analysis:
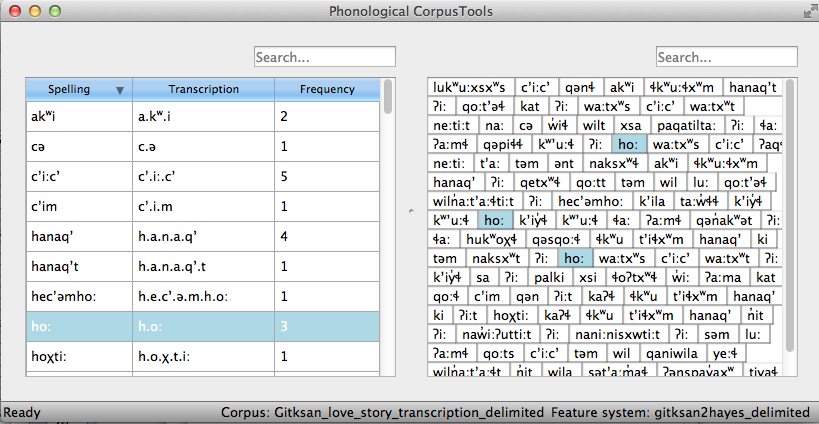
The corpus appears on the left, in the familiar columnar format. The original text of the corpus appears at the right. Right-clicking on a word in the corpus list gives you the option to “Find all tokens” in the running text; these words will be highlighted. Similarly, right-clicking a word in the running text gives you the option to “Look up word,” which will highlight the word’s entry in the corpus list.
Creating a spontaneous speech corpus
Currently, only limited functionality is available for spontaneous speech corpora, but this is a top priority for our next version. We provide an interface for importing the TIMIT corpus [TIMIT] or Buckeye corpus [BUCKEYE], if you have independently downloaded their corpus files. We currently provide preliminary capabilities to create a corpus by reading in the text from a set of Praat TextGrids.
Working with your own TextGrids
Textgrids are automatically inspected for two kinds of tiers, words and phones. Word tiers are ones that have some variation of “word” in them, either plural or singular, and with any case (i.e. “Word,” “word,” and “WORD” would all be detected). Phone tiers are ones that have a variant of “phone,” “segment,” “transcription,” or “seg” in them. All Point Tiers are ignored. All other interval tiers are included as word token attributes (e.g., if there’s a tier called “Speech style” and an interval named “casual” extends around the word token, the word token will have an attribute for “Speech style” with the value “casual”). If there are multiple speakers in a text gird, PCT expects word and phone tiers for each speaker, such as “Speaker 1 – word” and “Speaker 2 - word.”
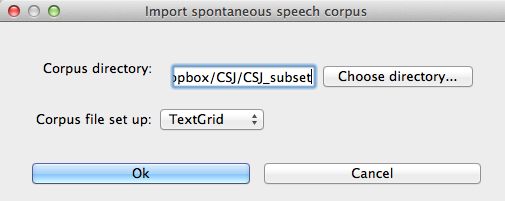
To create a spontaneous speech corpus from TextGrids, first ensure that your TextGrids are all located in a single directory and have the above properties. Click on “File” / “Load corpus...” / “Import spontaneous speech corpus.” Select the directory where your TextGrids are located, and choose “TextGrid” as the Corpus file set up option.
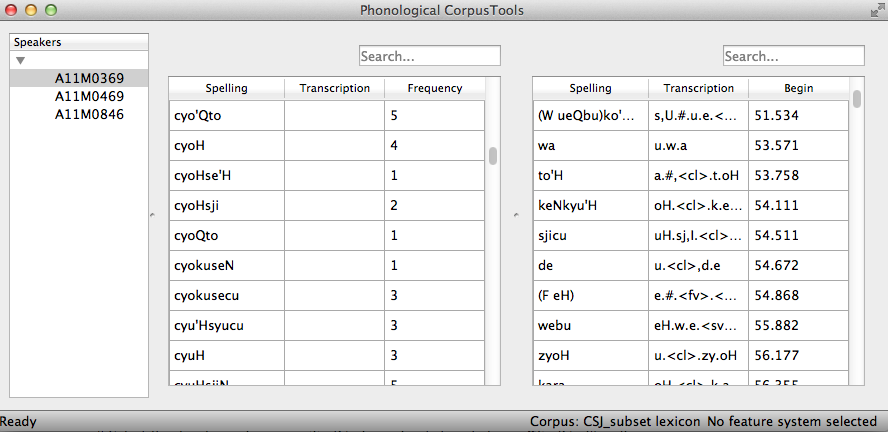
Here is an example of creating a corpus based on three .TextGrid files from the Corpus of Spontaneous Japanese [CSJ].
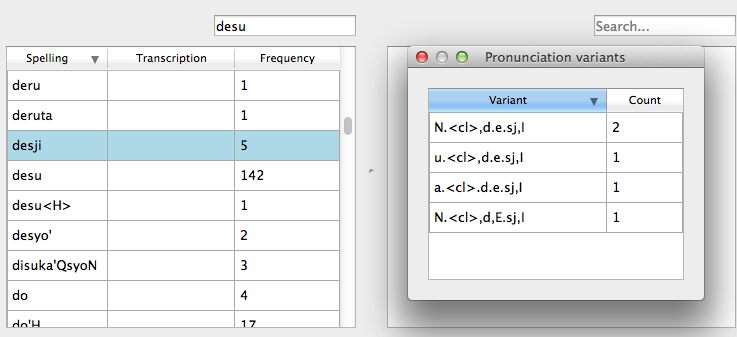
Once the TextGrids have been processed, they appear in a window such as the following. The regular corpus view is in the centre, with frequency counts aggregated over the entire set of speakers / TextGrids. Note that the transcription column may be blank for many words; this is because in spontaneous speech, the citation / spelled words often have multiple different transcribed forms in the corpus itself. To see these various transcriptions, right-click on any word in the corpus and select “List pronunciation variants.” A new dialogue box will pop up that shows the individual pronunciation variants that occur in the corpus for that word, along with their token frequencies.
In this example, each TextGrid is interpreted as belonging to a different speaker, and these individual speakers are listed on the left. Clicking on one of the speakers shows the transcript of that speaker’s speech in a box on the right. This is not a corpus, but rather a sequential listing of each word that was extracted, along with the transcription and the timestamp of the beginning of that word in the TextGrid. Right-clicking on a word in this list will give you the option to look up the word’s summary entry in the corpus. Right-clicking a word in the overall corpus will give you the option to “Find all tokens” of that word in the transcriptions, where they will simply be highlighted.
Creating a corpus file on the command line
In order to create a corpus file on the command line, you must enter a command in the following format into your Terminal:
pct_corpus TEXTFILE FEATUREFILE
...where TEXTFILE is the name of your input text file and FEATUREFILE is the name of your feature file. You may specify file names using just the file name itself (plus extension) if your current working directory contains the files; alternatively, you can specify the full path to these files. Please do not mix short and full paths. You may also use command line options to change the column delimiter character or segment delimiter character from their defaults (‘t’ and ‘’, respectively). Descriptions of these arguments can be viewed by running pct_corpus -h or pct_corpus --help. The help text from this command is copied below, augmented with specifications of default values:
Positional arguments:
- -t TRANS_DELIMITER
- --trans_delimiter TRANS_DELIMITER
Character delimiting segments in input file, defaults to the empty string
EXAMPLE:
If your pre-formatted text file is called mytext.txt and your features are hayes.feature, and if mytext.txt uses ; as column delimiters and . as segment delimiters, to create a corpus file, you would need to run the following command:
pct_corpus mytext.txt hayes.feature -d ; -t .
Summary information about a corpus
Phonological CorpusTools allows you to get summary information about your corpus at any time. To do so, go to “Corpus” / “Summary.”
- General information: At the top of the “Corpus summary” dialogue box, you’ll see the name of the corpus, the feature system currently being used, and the number of words (entries) in the corpus.
- Inventory: Under the “Inventory” tab, there will generally be three
sections, “Consonants,” “Vowels,” and “Other.” (Note that this assumes
there is an interpretable feature system being used; if not, then all
elements in the inventory will be shown together.) Clicking the box
next to “Consonants” will show you the current set of consonants,
roughly arranged according to the IPA chart. Similarly, clicking the
box next to “Vowels” will show you the current set of consonants,
roughly arranged according to the IPA chart. Any other symbols
(e.g., the symbol for a word boundary, #) will be shown under “Other.”
- Segments: Clicking on any individual segment in the inventory will display its type and token frequency in the corpus, both in terms of the raw number of occurrences and the percentage of occurrences.
- Columns: Under the “Columns” tab, you can get information about each of the columns in your corpus (including any that you have added as tiers or other columns; see Adding, editing, and removing words, columns, and tiers). The column labels are listed in the drop-down menu. Selecting any column will show you its type (spelling, tier, numeric, factor) and other available information. Tier columns (based on transcriptions) will indicate which segments are included in the tier. Numeric columns will indicate the range of values contained.
Once you are finished examining the summary information, click “Done” to exit.
Subsetting a corpus
It is possible to subset a corpus, creating new corpora that have only a portion of the original corpus. For example, one might want to create a subset of a corpus that contains only words with a frequency greater than 1, or contains only words of a particular part of speech or that are spoken by a particular talker (if such information is available). The new subsetted corpus will be saved and made available to open in PCT as simply a new corpus.
To create a subset, click on “File” / “Generate a corpus subset” and follow these steps:
- Name: Enter the name for your new corpus. The default is to use the name of the current corpus, followed by “_subset,” but a more informative name (e.g., “Gitksan_nouns”) may be useful.
- Filters: Click on “Add filter” to add a filter that will be used to subset the corpus. You can filter based on any numeric or factor tier / column that is part of your corpus. For a numeric column (e.g., frequency), you can specify that you want words that have values that are equal to, greater than, less than, greater than or equal to, less than or equal to, or not equal to any given value. For a factor column (e.g. an abstract CV skeleton tier), you can add as many or as few levels of the factor as you like.
- Multiple filters: After a filter has been created, you can choose to “Add” it or “Add and create another” filter. The filters are cumulative; i.e., having two filters will mean that the subset corpus will contain items that pass through BOTH filters (rather than, say, either filter, or having two subsets, one for each filter).
- Create subset: Once all filters have been selected, click on “Create subset corpus.” You will be returned to your current corpus view, but the subsetted corpus is available if you then go to “File” / “Load corpus...” – it will automatically be added to your list of available corpora. Note that the subset corpus will automatically contain any additional tiers that were created in your original corpus before subsetting.
Saving and exporting a corpus or feature file
If “Auto-save” is on (which is the default; see Preferences), most changes to your corpus (adding words, tiers, etc.) will be saved automatically and will be available the next time you load the corpus in PCT. Some changes are not automatically saved (removing or editing word entries), even if Auto-save is on, to prevent inadvertant loss of information. If you have made changes that have not been automatically saved, and then quit PCT, you will receive a warning message indicating that there are unsaved changes. At that point, you may either choose “Don’t save” (and therefore lose any such changes), “Save” (to save the changes in its current state, to be used the next time it is loaded into PCT), or “Cancel” (and return to the corpus view). It is also possible to export the corpus as a text file (.txt), which can be opened in other software, by selecting “File” / “Export corpus as text file” and entering the file name and location and the column and transcription delimiters. Similarly, the feature system can also be exported to a .txt file by selecting “File” / “Export feature system as text file” and selecting the file name and location and the column delimiter. See more about the utility of doing so in Working with transcriptions and feature systems.
Setting preferences and options
Preferences
There are several preferences that can be set in PCT. These can be selected by going to “Options” / “Preferences....” The following are available:
- Storage:
- File location: By default, PCT will save corpus, feature, and result files to your local “Documents” directory, which should exist under the default settings on most computers. When saving a particular output file, you can generally specify the particular storage location as you are saving. However, it is also possible to change the default storage location by changing the file path in this dialogue box. You may enter the path name directly, or select it from a system window by selecting “Choose directory...”.
- Auto-save: By default, PCT will automatically save changes to a corpus (e.g., if you have updated a feature system, added a tier, etc.). De-select this option if you prefer to manually save such changes (PCT will prompt you before closing without saving). Changes to word entries (removing or editing a word) are NOT auto-saved and should be saved manually if you want them to be saved; again, PCT will prompt you to save in these cases before exiting. Once Auto-save is deselected, PCT will remember that this is your preference for the next time you open the software - it will not automatically get turned back on.
- Display: By default, PCT will display three decimal places in on-screen results tables (e.g., when calculating predictability of distribution or string similarity, etc.). The number of displayed decimal places can be globally changed here. Note that regardless of the number specified here, PCT will save results to files using all of the decimal places it has calculated.
- Processing: Some calculations consume rather a lot of computational resources and can be made faster by using multiprocessing. To allow PCT to use multiprocessing on multiple cores when that is possible, select this option and indicate how many cores should be used (enter 0 to have PCT automatically use the ¾ of the number of cores available on your machine).
Help and warnings
When using PCT, hovering over a dialogue box within a function will automatically reveal quick ToolTips that give brief information about the various aspects of the function. These can be turned on or off by going to “Options” / “Show tooltips.”
PCT will also issue certain warnings if various parameters aren’t met. It is possible to turn warning messages off by going to “Options” / “Show warnings.”
Copying and pasting
It is possible to highlight the cells in any table view (a corpus, a results window, etc.) and copy / paste a tab-delimited string version of the data into another program (e.g., a spreadsheet or text editor) using your standard copy & paste keyboard commands (i.e., Ctrl-C and Ctrl-V on a PC; Command-C and Command-V on a Mac).