Environment Selection
There are many instances in PCT where you are given the opportunity to define environments that will be used in an analysis. This section describes the general interface used in all such instances.
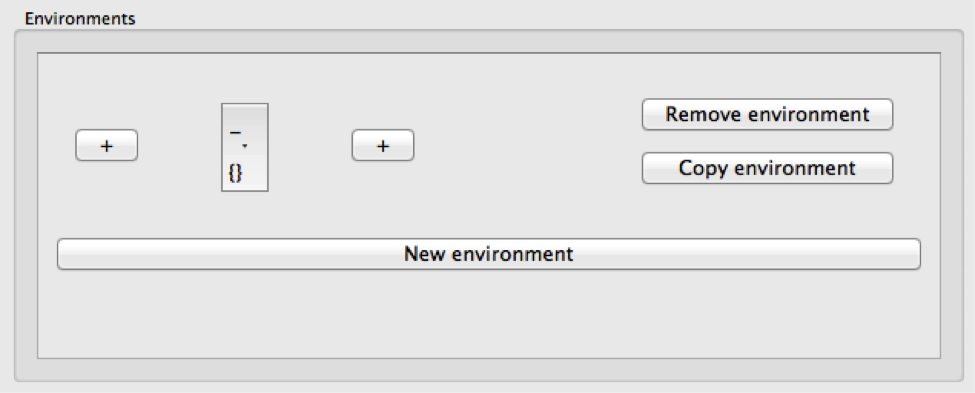
When you have the opportunity to define an environment, you will see a blank “Environments” box with a button in it for “New environment.” Start by clicking this button to create a new environment – you can click it as many times as you need to define multiple environments.
When a new environment has been added, it starts out blank. Environments are basically divided into three sections: the target, the left-hand side, and the right-hand side.
The central rectangle marks the “target” of the environment and has an underscore at the top and a set of empty curly brackets, {}, beneath. Depending on where you are building the environment, you may be able to edit the contents of this target. E.g., if you are doing a Phonological Search, you can put the target(s) of the search here, and fill in the environment around them. On the other hand, if you are builiding an environment to be used with pairs of sounds, as in the Predictability of Distribution analysis, you will have specified the target pairs of sounds independently, and cannot edit the targets in the environment selection box. In order to select a target in cases where it is editable, simply click on the central target box; a sound selection box will open. See Sound Selection for details on how to use this function, but basically, sounds can be selected either by clicking on segments or by specifying feature values. Multiple sounds can be selected as the targets; each will be placed in the same surrounding environments.
On either side of the central target rectangle, there is a “+” button. These allow you to add segments to either the left-hand or the right-hand side of the environment in an iterative fashion, starting with segments closest to the target and working out. Clicking on one of the “+” buttons adds an empty set {} to the left or right of the current environment.
To fill the left- or right-hand side, click on the rectangle containing the empty set {}. This again brings up the sound selection box; see Sound Selection for details. The environment can be filled by either clicking on segments or specifying features.
Note that regardless of whether targets and environments are selected by segments or by features, the result will be a disjunctive set of all segments that have been selected.
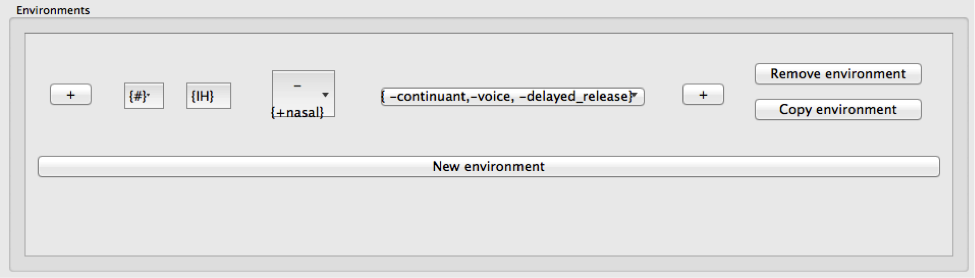
For example, to set up an environment that might be used to search for [n] vs. [m] vs. [ŋ] in words that start with [ɪ] and in which the nasal is followed by voiceless stop, one could do the following:
- Click on “New environment.” This gives you a blank environment:
- Click on the left-hand “+” sign once, and the right-hand “+” sign once. This will give you the following, still blank environment:

- Click the empty environment slot {} to the right of the target. A new menu pops up, with the following options:
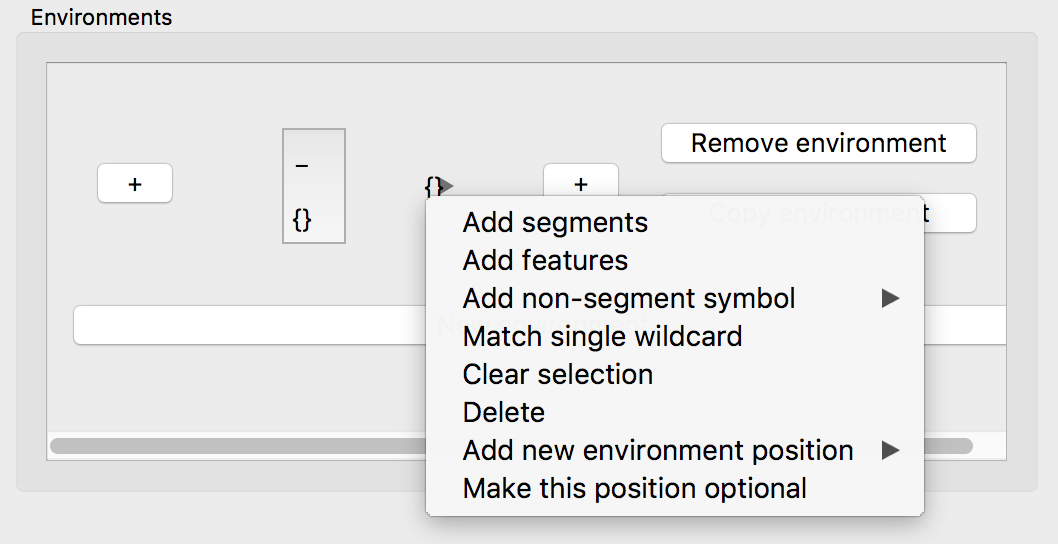
- These options are as follows:
- “Add segments” allows you to enter individual segments into the selected position (e.g., to search for [m] and [n]).
- “Add features” allows you to enter a set of features into the selected position (e.g. to search for nasals).
- “Add non-segment symbol” allows you to enter a symbol not classified as a segment (e.g., a word boundary).
- “Match single wildcard” allows you to enter a wildcard into the selected position. This is useful for ignoring intervening content. E.g., one could search for anything that occurs word-finally, by setting the target to a wildcard, or one could search for [m] and [n], followed by a wildcard, followed by a word boundary, to search for [m] and [n] as the penultimate segment in a word. Note that the wildcard position is just a single slot; PCT will simply treat it as a single segment that can be filled with any content (rather than, say, allowing any number of intervening elements). To get a more unbounded search, we recommend making use of additional tiers (e.g., setting up a tier that contains only [m], [n], and [#], and then searching for all words that have [m] or [n] directly followed by # on that tier; to learn more about tier creation, see Creating new tiers in the corpus). See also Preferences to switch between displaying the wildcard as an asterisk vs. as a list of all the segments in the inventory.
- “Clear selection” will clear the contents of this position if any contents have already been chosen.
- “Delete” allows you to delete the selected position entirely (not available for the central target position).
- “Add new environment position {To the left, To the right}” will insert an additional environment position in the selected location. This functions the same as the buttons with “+” signs, but allows additional environments to be inserted internally to the environment instead of solely at the periphery.
- For the target, select [m], [n], and [ŋ] using their features (e.g., [+nasal, -vocalic] or whatever combination of features is relevant for the corpus). (See Sound Selection for details.)
- Click the leftmost empty set.
- Select the word boundary symbol, #.
- Right-click on the # symbol and add an environment position to the right.
- Click the new empty set immediately to the left of the targets.
- Select the vowel [ɪ].
- Select the rightmost empty set.
- Select all voiceless stops (e.g., by using the features [-voice, -continuant, -delayed release]).
This now gives you an environment that looks something like the following (depending on the total inventory and the transcription system of your corpus; this example is from the IPHOD corpus):
To add additional environments, simply click “New environment.” To copy an existing environment (and then edit it, e.g., to search for a different set of sounds in the same environment), click “Copy environment.” To edit an environment, either right-click on on the rectangle containing the part of the environment you want to edit, clear the selection, and re-enter it, or click on the original selection to add to the original choices. To remove an environment entirely, click on the “Remove environment” button to the right.