Loading in corpora
In order to use the analysis functions in PCT, you’ll first need to open up a corpus. When we say a “corpus” in PCT, we mean a file that has the following basic structure: a list of words with other possible information about each: e.g., its transcription, its frequency of occurrence, its lexical category, its syllable structure, etc. These are in columnar format; e.g., loaded from a CSV or tab-delimited text file. (See more at Required format of corpus.)
There are five possible ways of getting a corpus in PCT:
Use one of the built-in corpora to get started immediately. You can choose between two small, entirely invented corpora that have various parameters (see Example corpora) or use the Irvine Phonotactic Online Dictionary of English [IPHOD];
Use a corpus in the above format that is independently stored on your local computer;
Create a corpus from running text (e.g., straight transcriptions of speech or interlinear texts);
Create a corpus from Praat TextGrids [PRAAT];
Import a corpus from your own local copy of another standard corpus; currently, we support only the Buckeye corpus [BUCKEYE]; the TIMIT corpus [TIMIT] is not supported anymore. (PCT is intended to focus on analyses of lexical and usage-based statistics and phonological analysis. The TIMIT corpus is not actually structured for this kind of work, because it is a pre-structured corpus rather than containing spontaneous-style speech. It is also not trivial to figure out how to develop a PCT-compatible feature system for the TIMIT-style transcriptions, where sub-segmental units are transcribed separately (e.g., stop closure vs. release burst). Thus, we no longer support the TIMIT format.)
Each of these options is discussed in more detail below.
Note that for any of these scenarios, if you load a corpus without associating it with a feature system, you will have the option to associate a system to the corpus later (see Applying / editing feature systems). If you load a corpus and try to associate it with a pre-existing feature system that does not in fact have all the segments in the corpus in it (e.g., you’re basically using an IPA-based transcription system, but your corpus includes the symbol [č]), then PCT will warn you and ask if you want to proceed. If you do proceed, PCT will automatically create a copy of the existing feature file, add the new segment(s), and give them default feature values of ‘n’ for all features. The new feature system will be called the same thing as the old one, but will be relativised to the appropriate corpus. E.g., if the original feature system was the ipa2hayes system, and the corpus containing [č] is called ‘November_fieldwork’, then the new feature system will automatically be called ipa2hayes_November_fieldwork. This feature system is editable and available for use with any other corpora, as generally described in Applying / editing feature systems.
Also note that all created or downloaded corpus files are stored as .corpus in the working directory of PCT. See Local storage for details.
Using a built-in corpus
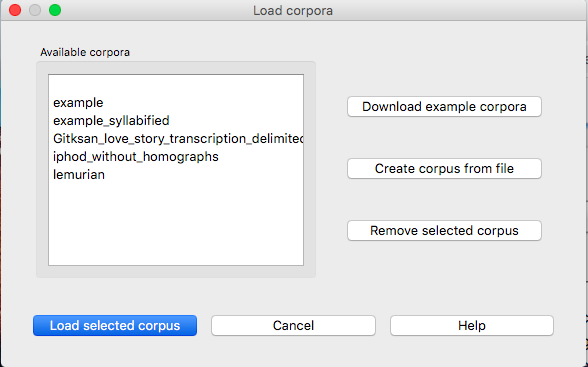
To use a built-in corpus, simply go to the “File” menu and select “Load corpus…” from the list, which will open the “Load corpora” dialogue box.
As of v. 1.5.0, these corpora are directly packaged with the executable version of PCT and should simply be available on opening the software. You can also download them directly from GitHub: https://github.com/PhonologicalCorpusTools/PCT_Fileshare/tree/main/CORPUS See Local storage for details on how to store and access these.
Before v. 1.5.0, the first time you wanted to use a built-in corpus, you needed to download it (from a Dropbox link accessed by PCT internally); you had to therefore be connected to the internet to complete this step. To do so, click on “Download example corpora” from the right-hand menu. This will allow you to download either of the two example corpora (one is called “example” and the other called “Lemurian” (both are entirely made up; see Example corpora) and/or the two versions of IPhOD corpus [IPHOD].
Note that there are currently two versions of IPhOD corpus available on PCT: ‘IPHOD with homographs’ and ‘IPHOD without homographs.’ The one without homographs was the default up to 2019. ‘IPHOD with homographs’ contains all different pronunciations of a homograph provided in the original IPhOD corpus, while the other version only has one pronunciation. As the ‘(token) frequency’ (from the SUBTLEX corpus [SUBTLEX]) is for each orthographic word, the same frequency value is given for two or more homographs. Therefore, it is important to note that using the one with homographs may double count the frequency of a lexeme in analyses.
For example, the word ‘African’ is a homograph as it has two pronunciations, transcribed as /AE.F.R.AH.K.AH.N/ and /AE.F.R.IH.K.AH.N/, respectively. ‘IPHOD with homographs’ contains both pronunciations as separate entries. Both entries have the same value, 6.76 (per million words), for the ‘Frequency’ column. ‘IPHOD without homographs,’ on the other hand, only has /AE.F.R.AH.K.AH.N/ with the frequency of 6.76.
Also note that the versions of the IPHOD corpus that are contained here have been altered from the freely downloadable version, in that they (1) do not have the derived columns and (2) have been re-formatted as a .corpus file for easy reading by PCT. They also contain only the following information: word, transcription, and token frequency (from the SUBTLEX corpus [SUBTLEX]). Please note that if you use the IPHOD corpus, you should use the following citation (see more on citing corpora and functions of PCT in Citing PCT and the algorithms used therein):
Vaden, K. I., Halpin, H. R., Hickok, G. S. (2009). Irvine Phonotactic Online Dictionary, Version 2.0. [Data file]. Available from http://www.iphod.com/.
After the corpus has been downloaded, it appears in the lefthand side of the “Load corpora” dialogue box. Simply select the corpus and click on “Load selected corpus” at the bottom of the dialogue box. Once these corpora have been downloaded once, you don’t have to do so again; they will be saved automatically to your local system unless and until you delete them. On subsequent loadings of the PCT software, you will still see these corpora listed in the lefthand side of the “Load corpora” dialogue box, as in the following diagram:
The example corpora and the included version of the IPHOD corpus include phonetic transcriptions (in IPA for the example corpora and in Arpabet for IPHOD), and are by default interpreted either using the feature system of [Mielke2012], which in turn is based on SPE features [SPE] [this is the default for the example corpus], or using the feature system suggested by [Hayes2009] [this is the default for the IPHOD corpus and the Lemurian corpus]. These systems are fully functional for doing subsequent analyses.
Again, prior to v. 1.5.0, this was a built-in functionality of these particular corpora, and did not allow you to use SPE or Hayes features with other corpora. To use SPE features with other corpora, or to change the feature system associated with a built-in corpus prior to 1.5.0, you’ll need to download the actual feature files, as described in Working with transcriptions and feature systems. Features can be used for defining classes of sounds (e.g., creating separate tiers for different types of segments) and for defining environments (e.g., the environments in which segments might occur, for use in calculating their predictability of distribution). As of v. 1.5.0, feature systems are also packaged directly with the software and should be immediately accessible, though they can also be downloaded manually from https://github.com/PhonologicalCorpusTools/PCT_Fileshare/tree/main/FEATURE.
The corpus may take several seconds to load, but will eventually appear; the following is the example corpus:

Note that the name of the corpus and the current feature system are shown at the bottom right-hand corner of the screen for easy reference. Summary information about a corpus gives more detail on how to find out summary information about your corpus. Typing a word or part-word in the “search” box takes you to each successive occurrence of that word in the corpus (hit “return” once to see the first instance; hit “return” again to see the second, etc.). Note that the “search” box searches only the “Spelling” column of the corpus. To do a phonological search, please use the “Phonological search” function under the “Corpus” menu (see detailed discussion in Phonological search).
For more details on the structure of the Lemurian corpus, which has been built to show particular kinds of phenomena that may be of interest to PCT users, please see the section on The Lemurian corpus.
Creating a corpus
It is also possible to create a corpus within PCT. These can be pre-formatted columnar corpora or corpora that are compiled from running text, TextGrids, or special corpus formats. It may be helpful to first load the relevant feature system for your corpus into PCT, so that the transcriptions in your corpus can be interpreted; detailed instructions for doing this are given in Working with transcriptions and feature systems (note that the corpus can be loaded in without featural interpretation, and features added later).
In all cases, to use a custom corpus, click on “File” / “Load corpus…” and then choose “Create corpus from file.” The “Import corpus” dialogue box opens up.
At the top of the box, enter the path for the file that will form the corpus or select it using “Choose file…” and navigating to it from a system dialogue box. If the corpus is being created from a series of .txt files or .TextGrid files or other special files instead of a single file (e.g., being compiled from multiple files of running text or specially formatted corpora such as the Buckeye corpus), you can instead choose the directory that contains the files. All files that PCT thinks are plausible will be selected, ignoring other files. For example, if you have both .txt and .pdf files in a directory, only the .txt files will be selected. If there are both .txt and .TextGrid files (both of which could be used by PCT), it will read in only the one that has a greater number of instances in the directory. That is, if there are more .TextGrid files than .txt files, it will assume it should read the .TextGrid files (or vice versa). If you have selected a directory, you can hover the mouse over the box labeled “Mouseover for included files” to see a pop-up list of exactly which files in a directory have been chosen. Obviously, you can manually force PCT to read in all of your intended files by simply putting all and only those files into a single directory. Note that for a pre-formatted columnar corpus, a single file must be chosen, rather than a directory of files.
Enter a name for the corpus in the box to the right of the corpus source selection. (Note that on some screens, the box may initially appear to be absent; simply re-size the “Import corpus” dialogue box to make it appear.)
PCT will automatically detect what kind of file type you have selected and select the tab for the corpus type that it thinks most likely. For .txt files, it will default to assuming it is a column-delimited file, but you can easily select the “running text” or “interlinear text” tabs instead. For .TextGrid files, it will take you to the TextGrid tab; if it detects a directory of Buckeye files, it will take you to the “Other standards” tab. The choices within each of these tabs is described below: Column-delimited files; Running Text; Interlinear Text; TextGrids; Other Standards
Column-delimited files
If you have a corpus that is in the appropriate format (see Required format of corpus) and stored independently on your computer, you can read it in as a column-delimited file.
Once you have selected the file path and named the corpus (see Creating a corpus) , make sure that the “Column-delimited file” tab is selected. PCT will automatically try to figure out what delimiter (e.g., comma, tab) is used to separate columns, but you can also enter it manually (e.g., a comma (,) or a tab (t)). Any symbol can be used; PCT will simply break elements at that symbol, so whatever symbol is used should be used only to delimit columns within the corpus.
If there is a column in the corpus that shows phonetic transcription, choose which feature system you would like to use. As noted above, in order for there to be feature systems to choose from, you must first have loaded them into PCT (Working with transcriptions and feature systems). If you haven’t yet added any, you may still import the corpus and then add them later.
To parse transcription with syllable boundaries, you have to put the syllable-delimiter symbol in the “Syllable delimiter” box. Note also that in order for the syllable-parsing algorithm to work (which just assigns the nucleus to the [+syllabic] segment in a syllable and onset/coda to segments that come before/after the nucleus), you have to specify all feature values to all the segment present in the corpus in the feature file.
On the right-hand side of the “Import corpus” dialogue box, you will see a “Parsing preview” window. This shows each of the columns in the corpus and allows you to specify particular parameters for each one. For details on this, please see the section on Parsing Parameters.
Once all selections have been made, click “Ok.” PCT will process the corpus (depending on how big it is, this may take a few minutes). It will then appear listed in the “Available corpora” window in the “Load corpus” dialogue box; you can select it and then click “Load selected corpus” to open it.
Note: the processed version of the corpus is stored in a .corpus file and automatically lives in a “CORPUS” folder in Documents / PCT / CorpusTools on your hard drive. See Preferences for information on how to change this.
See also Logging / Saving Parsing Parameters for information about how the parameters you picked when loading the corpus are temporarily saved.
Below is a picture of the “Import corpus” dialogue box set up to load in a .csv file with orthography, transcription, and frequency columns:

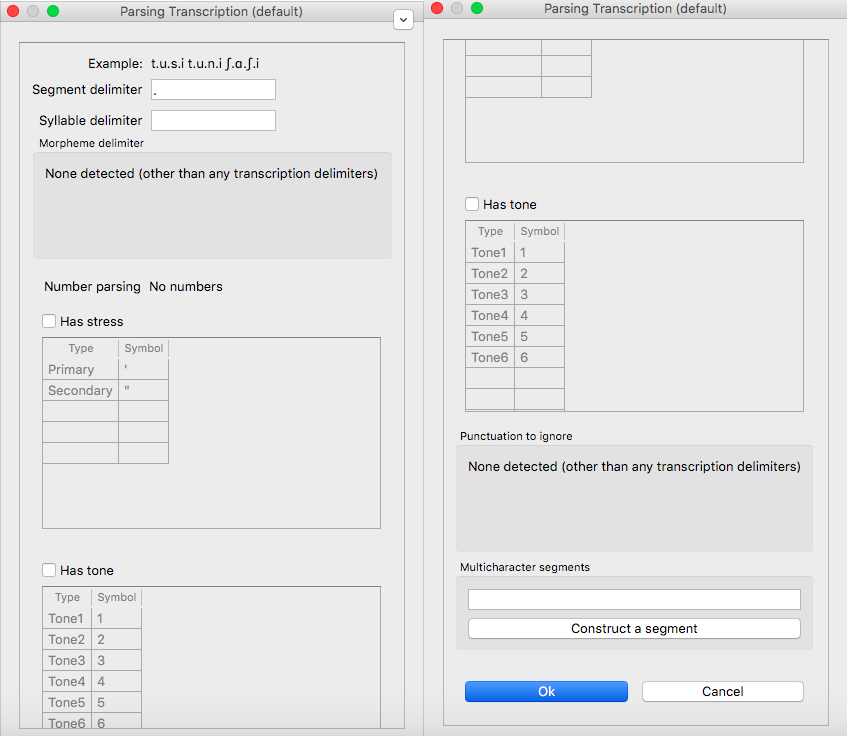
And here is the “Parsing settings” window of the transcription column (note that because of the length of the window, we have split this image into two side-by-side images; in PCT itself, this is a single long vertical window):
Running Text
It is also possible to have PCT create a corpus for you from running text, either in orthographic or transcribed form. If the text is orthographic, of course, then segmental / phonological analysis won’t be possible, but if the text is itself a transcription, then all subsequent analysis functions are available. (Please see the section on Interlinear Text for running texts that interleave orthographic and phonetic transcriptions.)
Once you have selected the file path or directory and named the corpus (see Creating a corpus), make sure that the “Running text” tab is selected. Select whether the text is spelling (“Orthography”) or phonetic transcription (“Transcribed”).
If the running text is transcribed, choose which feature system you would like to use. As noted above, in order for there to be feature systems to choose from, you must first have loaded them into PCT (Working with transcriptions and feature systems). If you haven’t yet added any, you may still import the corpus and then add them later.
If the running text is orthographic, and you have a corpus that contains transcriptions for the language of the running text, you can have PCT look up the transcriptions of words in that “support corpus.” This must be a corpus that has already been created in PCT. For example, you could first download the IPHOD corpus (see Using a built-in corpus) and then ask PCT to create a corpus from a .txt file that contains English prose, looking up each word’s transcription in the IPHOD corpus. You can specify that case should be ignored during lookup (e.g., to allow PCT to find the transcriptions of words even if they happen to be capitalized at the beginning of sentences in the running text).
At the right-hand side of the “Import corpus” dialogue box, you will see a “Parsing preview” window for the column of the corpus that will result from the running text. (The frequency of individual words in the text will be created automatically.) Please see the section on Parsing Parameters for details on how to make choices in this window.
Once all selections have been made, click “Ok.” PCT will process the corpus (depending on how big it is, this may take a few minutes). It will then appear listed in the “Available corpora” window in the “Load corpus” dialogue box; you can select it and then click “Load selected corpus” to open it.
Note: the processed version of the corpus is stored in a .corpus file and automatically lives in a “CORPUS” folder in Documents / PCT / CorpusTools on your hard drive. See Preferences for information on how to change this.
See also Logging / Saving Parsing Parameters for information about how the parameters you picked when loading the corpus are temporarily saved.
Interlinear Text
In addition to plain running text (Running Text), PCT also supports building corpora from interlinear texts, e.g., those with spelling and transcription on alternating lines. Interlinear texts may have any number of repeating lines.
Once you have selected the file path or directory and named the corpus (see Creating a corpus), make sure that the “Interlinear text” tab is selected.
PCT will start by automatically inspecting the text for characteristics that seem to repeat on particular sets of lines, to figure out how many lines there are per “unit.” E.g., a text that has spelling on the first line, transcription on the second, and glosses on the third will be automatically detected as having 3 lines per unit. The number can also be specified manually. Note that the text must maintain this pattern throughout; deviations will cause errors in how PCT reads in the data.
If the text is transcribed, choose which feature system you would like to use. As noted above, in order for there to be feature systems to choose from, you must first have loaded them into PCT (Working with transcriptions and feature systems). If you haven’t yet added any, you may still import the corpus and then add them later.
On the right hand side of the dialogue box, you’ll see a “Parsing preview” window which allows you to inspect each line of the gloss and specify how that line is interpreted. Please see the section on Parsing Parameters for details on how to make choices in this window.
Once all selections have been made, click “Ok.” PCT will process the corpus (depending on how big it is, this may take a few minutes). It will then appear listed in the “Available corpora” window in the “Load corpus” dialogue box; you can select it and then click “Load selected corpus” to open it.
Note: the processed version of the corpus is stored in a .corpus file and automatically lives in a “CORPUS” folder in Documents / PCT / CorpusTools on your hard drive. See Preferences for information on how to change this.
See also Logging / Saving Parsing Parameters for information about how the parameters you picked when loading the corpus are temporarily saved.
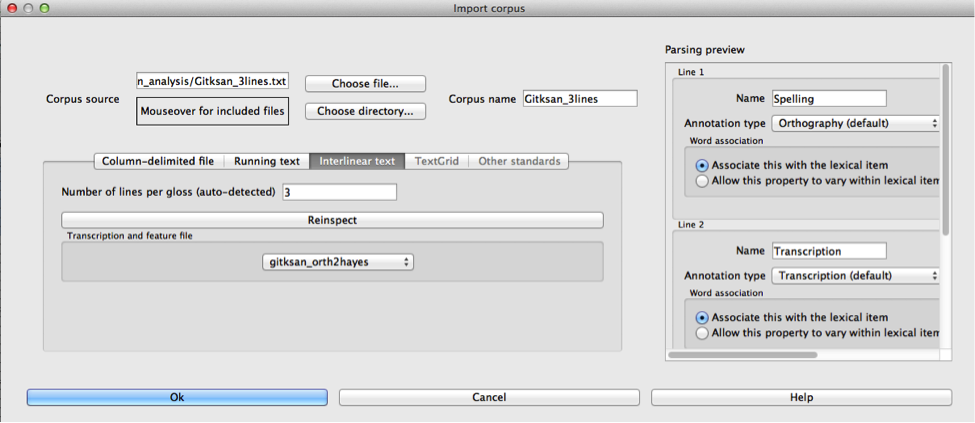
An example of the “Import corpus” dialogue box set up for loading in a 3-line interlinear Gitksan text:
TextGrids
PCT can also be used to create corpora from a collection of Praat TextGrids [PRAAT]. This is particularly useful for creating spontaneous speech corpora from recordings, especially if the transcription is based on what was actually spoken rather than on canonical forms of each word – PCT can keep track of the individual pronunciation variants associated with individual words (see Pronunciation Variants). PCT uses the TextGrid package (https://pypi.org/project/TextGrid/) to read in .TextGrid files. Currently, it uses TextGrid version 1.1, which has been added to the /corpustools/corpus/io folder to maintain compatibility.
Once you have selected the file path or directory and named the corpus (see Creating a corpus), make sure that the “TextGrid” tab is selected (this should happen automatically if the file extension(s) is .TextGrid).
If any of the tiers in the TextGrid is a transcription tier, choose which feature system you would like to use. As noted above, in order for there to be feature systems to choose from, you must first have loaded them into PCT (Working with transcriptions and feature systems). If you haven’t yet added any, you may still import the corpus and then add them later.
If any of the tiers in the TextGrid is orthographic, and you have a corpus that contains transcriptions for the language of the text, you can have PCT look up the transcriptions of words in that “support corpus.” This must be a corpus that has already been created in PCT. For example, you could first download the IPHOD corpus (see Using a built-in corpus) and then ask PCT to create a corpus from a .txt file that contains English prose, looking up each word’s transcription in the IPHOD corpus. You can specify that case should be ignored during lookup (e.g., to allow PCT to find the transcriptions of words even if they happen to be capitalized at the beginning of sentences in the running text).
At the right-hand side of the “Import corpus” dialogue box, you’ll see a “Parsing preview” window. This will give you choices for how to parse each tier of the TextGrid, labelled with the original names of the tiers. Please see the section on Parsing Parameters for details on how to make choices in this window.
Once all selections have been made, click “Ok.” PCT will process the corpus (depending on how big it is, this may take a few minutes). It will then appear listed in the “Available corpora” window in the “Load corpus” dialogue box; you can select it and then click “Load selected corpus” to open it.
Note: the processed version of the corpus is stored in a .corpus file and automatically lives in a “CORPUS” folder in Documents / PCT / CorpusTools on your hard drive. See Preferences for information on how to change this.
See also Logging / Saving Parsing Parameters for information about how the parameters you picked when loading the corpus are temporarily saved.
Other Standards
Finally, PCT comes pre-equipped to handle certain other standard corpus types. At the moment, the only supported standards are the Buckeye corpus [BUCKEYE]. You must obtain your own copy of the Buckeye corpus through its usual means and store it locally; PCT simply gives you a way to easily open these corpora in the standard PCT format.
When selecting the corpus source, navigate to the directory where the Buckeye files are stored. PCT will automatically detect the format of files in the directory and select the “Other Standards” tab. Within that tab, it will also automatically select the file format.
If the text is transcribed, choose which feature system you would like to use. As noted above, in order for there to be feature systems to choose from, you must first have loaded them into PCT (Working with transcriptions and feature systems). If you haven’t yet added any, you may still import the corpus and then add them later. There is an option to download a Hayes-style feature system ([Hayes2009]) for the Buckeye corpus transcriptions.
At the right-hand side of the “Import corpus” dialogue box, you’ll see a “Parsing preview” window. This will give you choices for how to parse each part of the original corpus. Please see the section on Parsing Parameters for details on how to make choices in this window.
Once all selections have been made, click “Ok.” PCT will process the corpus (depending on how big it is, this may take a few minutes). It will then appear listed in the “Available corpora” window in the “Load corpus” dialogue box; you can select it and then click “Load selected corpus” to open it.
Note: the processed version of the corpus is stored in a .corpus file and automatically lives in a “CORPUS” folder in Documents / PCT / CorpusTools on your hard drive. See Preferences for information on how to change this.
See also Logging / Saving Parsing Parameters for information about how the parameters you picked when loading the corpus are temporarily saved.
Required format of corpus
In order to use your own corpus, it must have certain properties. First, it should be some plain text file (e.g., .txt, .csv); it cannot, for example, be a .doc or .pdf file. The file should be set up in columns (e.g., imported from a spreadsheet) and be delimited with some uniform character (tab, comma, backslash, etc.). The names of most columns of information can be anything you like, but the column representing common spelling of the word should be called “spelling”; that with transcription should be called “transcription”; and that with token frequency should be called “frequency.” All algorithms for doing corpus analysis will assume these column names. If, for example, you were using a corpus that had different frequency columns for total frequency vs. the frequency of occurrence of the word in its lowercase form (cf. the SUBTLEX corpus), then whichever column is to be used for token frequency calculations should simply be labelled “frequency.”
Parsing Parameters
This section outlines the choices that can be made in the “Parsing Preview” section of the import corpus dialogue box. In order for this section to be available, you need to have first started to import a corpus and selected a file, as described in the section on Creating a corpus.
Name: Specify the name of the column. If you are importing from a column-delimited file or a TextGrid with tiers, PCT will default to the name of the column / tier that is there. If you are reading from a running text or interlinear gloss file, and have specified that the file is either orthographic or transcribed, PCT will default to “Spelling” or “Transcription,” respectively. You may also manually enter the name.
Annotation type: Specify what type of information the column will contain. The default is simply a numeric or character column, depending on what type of information PCT automatically detects. IMPORTANT: You should specify which column you want PCT to treat as the “Orthography” and “Transcription” columns – without these named annotation types, some of the functions in PCT will not work, as they call on these particular types of columns.
Word association: Specify whether the information in the column should be associated with lexical items or should be allowed to vary within lexical items. Most types of information will be associated with lexical items (e.g., spelling, frequency). There are some kinds of information that do vary depending on the specific token, however, such as pronunciation variants. These are most likely to arise when creating a corpus from a TextGrid that has a tier for lexical items (e.g., based on spelling on canonical transcriptions) and then a separate tier that will show the characteristics of particular tokens (similar structures may be found with interlinear glosses). Currently, PCT allows the choice of varying within lexical items ONLY for columns labelled as ‘Transcription (alternative).’ See also Pronunciation Variants and specifically Creating Pronunciation Variants:.
Delimiters and Special Characters: For transcription and orthography columns, transcription and morpheme delimiters as well as any special characters are previewed at the right-hand side of the column information box. By clicking on “Edit parsing settings,” you can edit these, as follows:
Example: At the top of the “parsing” dialogue box, you will see an example of the entries in the column, to remind yourself of what sort of entries you are dealing with.
Segment delimiter: If your transcriptions are delimited by segment, (i.e., have special characters that indicate segment breaks, as in [t.ai.d] for the word ‘tide’) you can enter the delimiting character here. PCT will automatically search for this delimiter, but you may adjust it manually as well. For more on understanding complex transcriptions, see Complex transcriptions (Digraphs and other multi-character sequences).
Syllable delimiter: If your transcriptions use a delimiter for syllable, you can use syllable_mode in the phonological search. Similar to “Segment delimiter,” you can specify your syllable delimiter. For example, if the word ‘subtle’ is transcribed as [sə-tl], enter “-” here.
Morpheme delimiter: If your transcriptions include a morpheme delimiter (i.e., have special characters that indicate morpheme breaks, as in [ri-du] for the word ‘redo,’ you can enter the delimiting character here. PCT will automatically search for this delimiter, but you may adjust it manually as well.
Number parsing: If PCT detects that there are numbers in the transcriptions, you have several options. Sometimes, numbers are simply used as alternatives for segmental transcriptions (e.g., [2] is used in the Lexique corpus [LEXIQUE] for IPA [ø]); in this case, simply select that they should be treated the “Same as other characters.” In other cases, numbers may be used to indicate tone (e.g., [l.ei6.d.a1.k.s.eoi3] ‘profits tax’ might be used in a Cantonese corpus like the Hong Kong Cantonese Adult Language Corpus [HKCAC] to indicate the tone number associated with each vowel). In this case, select that number parsing should be “Tone.” Finally, numbers might be used to indicate stress (e.g., [EH2.R.OW0.D.AY0.N.AE1.M.IH0.K] is the representation of the word “aerodynamic” in the IPHOD corpus [IPHOD] using CMU [CMU] transcriptions that include stress).
Has stress / Has tone: If your transcriptions use a special symbol to indicate the stress or tone, select the checkbox and specify the type and symbol in the table below.
Punctuation to ignore: If there are punctuation marks in the file, and these have not already been specified as being used as either transcription of morpheme delimiters, then they will be listed as possible punctuation marks that PCT can ignore. Ignoring punctuation allows PCT to compile an accurate count of unique words, especially from running texts; for example, the words “example” and “example,” should be treated as two tokens of the same word, ignoring the comma at the end of the second one. Punctuation can be included, however; this might be desirable in a case where a punctuation symbol is being used within the transcription system (e.g., [!] used for a retroflex click). Each symbol can be ignored or included as needed. (Clicking on the symbol so that it is selected makes PCT IGNORE the symbol in the corpus creation.)
Multicharacter segments: See the discussion in Constructed multicharacter sequences in the section on Complex transcriptions (Digraphs and other multi-character sequences) for details.
Complex transcriptions (Digraphs and other multi-character sequences)
There is no way for PCT to know automatically when a single sound is represented by a sequence of multiple characters – e.g., that the digraphs [aɪ], [tʰ], [xw], [p’], [tʃ], and [iː] are intended to represent single sounds rather than sequences of two sounds. There are currently three possible ways of ensuring that characters are interpreted correctly:
One-to-one transcriptions: The first way is to use a transcription system with a one-to-one correspondence between sounds and symbols, such as DISC. If you need to create a novel transcription system in order to accomplish this (e.g., using [A] to represent [aɪ] and [2] to represent [tʰ], etc.), you may certainly do so; it is then necessary to create a novel feature file so that PCT can interpret your symbols using known features. See detailed instructions on how to do this in Built-in transcription and feature choices. The word tide in American English might then be transcribed as [2Ad]. This is a relatively easy solution to implement by using find-and-replace in a text editing software, though it does result in less easily human-readable transcriptions.
Delimited transcriptions: The second way is to use a standard transcription system, such as IPA, but to delimit every unitary sound with a consistent mark that is not otherwise used in the transcription system (e.g., a period). Thus the word tide in American English might be transcribed in IPA as [tʰ.aɪ.d], with periods around every sound that is to be treated as a single unit. When creating the corpus, PCT will give you the option of specifying what the character is. PCT will then read in all elements between delimiting characters as members of a single “segment” object, which can be looked up in a standard feature file (either an included one or a user-defined one; see Using a custom feature system). This solution makes it easy to read transcribed words, but can be more labour-intensive to implement without knowledge of more sophisticated searching options (e.g., using regular expressions or other text manipulation coding) to automatically insert delimiters in the appropriate places given a list of complex segments. A first pass can be done using, e.g., commands to find “aɪ” and replace it with “.aɪ.” – but delimiters will also have to be added between the remaining single characters, without interrupting the digraphs.
Constructed multicharacter sequences
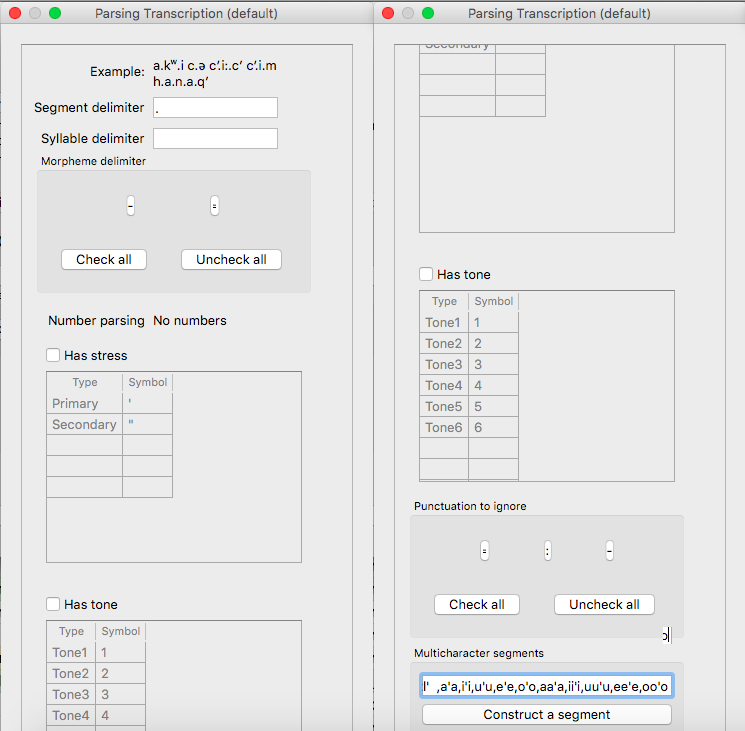
The third option is to tell PCT what the set ofmulticharacter sequences is in your corpus manually, and then to have PCT automatically identify these when it creates the corpus. This can be done by editing the parsing settings for a column during the import of a corpus. In the “Import corpus” dialogue box, there is an option to edit the parsing settings for each column in the corpus. At the bottom there is an option for listing multicharacter segments in the corpus. You may enter these manually, separated by commas, or choose “Construct a segment” to have help from PCT. If you are entering them manually, you may copy and paste from other documents (e.g., if you have created a list of such sequences independently). If you choose “Construct a segment,” PCT will scan the selected file for single characters and present these to you as options for constructing multi-character segments from.
For example, in the following box, all of the single characters in a Gitksan text file are presented, and can be selected sequentially to create the appropriate multi-character segments. This method is somewhat more labour-intensive in terms of knowing ahead of time what all the multi-character segments are and being able to list them, but ensures that all such occurrences are found in the text file. Note, however, that if there’s a distinction to be made between a sequence of characters and a digraph (e.g., [tʃ] as a sequence in great ship vs. as an affricate in grey chip), this method will be unable to make that distinction; all instances will be treated as multi-character segments. Each multi-character segment can be as long as you like. If there are shorter sequences that are subsets of longer sequences, PCT will automatically look for the longer sequences first, and separate them out; it will then scan for the shorter sequences. E.g., it will search for and delimit [tsʷ’] before it searches for [tsʷ], regardless of the order in which the sequences are entered. Note that the list of multicharacter segments is temporarily saved in a log file for the current PCT session; you may want to open the log file and copy and paste the set of multicharacter segments to a new file for your own later use. For instance, this is useful for times when you may want to re-create the corpus with different settings or formatting and don’t want to have to re-construct all the multi-character sequences by hand, as the entire list of multicharacter segments can simply be copy-pasted into the parsing dialogue box. See details on this feature in the Logging / Saving Parsing Parameters section.
Logging / Saving Parsing Parameters
When you import a new corpus into PCT, there are many parameters that you choose, such as the name of the corpus, the type of corpus, the various delimiters, ignored punctuation, multicharacter sequences, etc. – see Creating a corpus. Sometimes, you may find it necessary to tweak the parameters originally chosen once you’ve imported a corpus and loaded it in (for instance, you might realize that you forgot a particular digraph when you were specifying multicharacter segments). PCT automatically keeps a temporary log of the import settings on any given session. You can, for example, copy and paste the set of digraphs from this log to save and re-use in future sessions, rather than having to re-create them from scratch just to add a new one in. To limit the size of the log file, though, PCT will overwrite it every time PCT is re-launched with a new corpus import, so any information that is important should be saved from the log file manually.
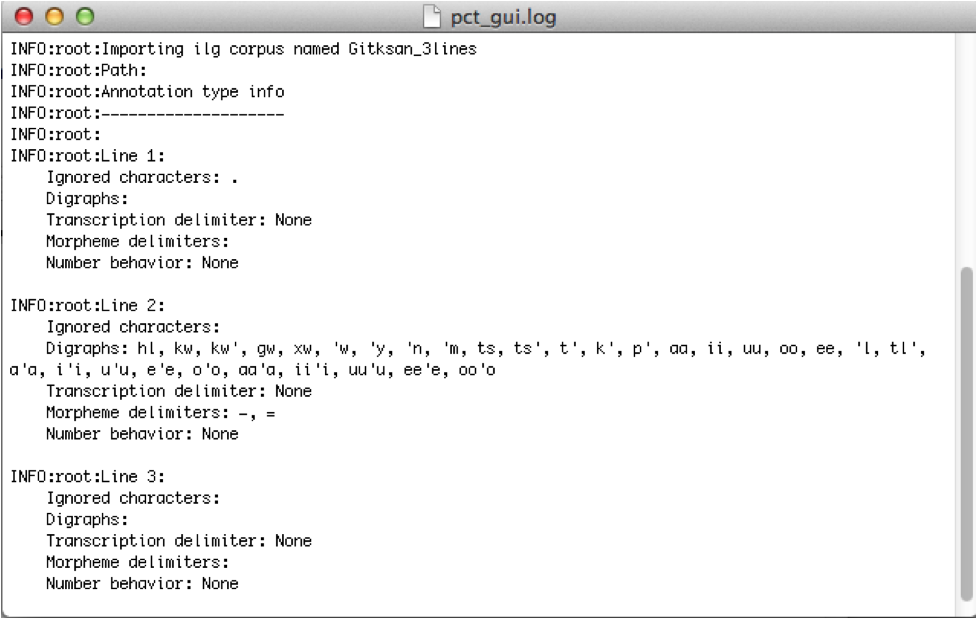
To access the log file, go to the directory where your PCT files are stored. By default, this is Documents / PCT / CorpusTools, but you can change this location; to do so, see the Preferences section. Within this directory, click on the “log” folder; you will see a pct_gui.log file. This can be opened in any text editor. Information from this file can be copied and pasted into a separate document that can be saved for future reference.
Here’s an example of the log file after importing a 3-line interlinear gloss file of Gitksan:
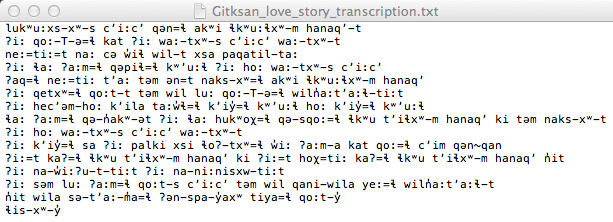
The following shows an example of a transcribed Gitksan story transformed into a (small!) corpus (with grateful acknowledgement to Barbara Sennott and the UBC Gitksan language research group, headed by Lisa Matthewson & Henry Davis, for granting permission to use this text):
The original transcribed story:
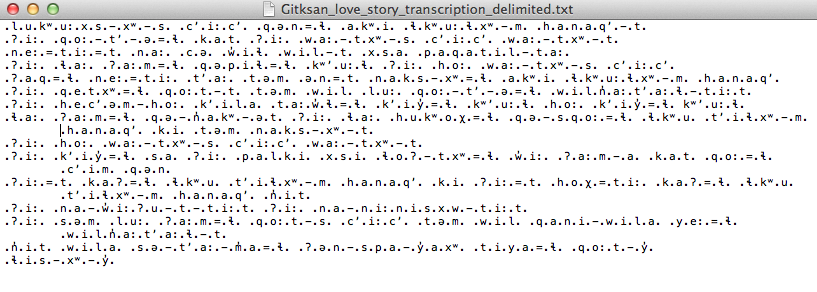
The transcription delimited with periods to show unitary characters:
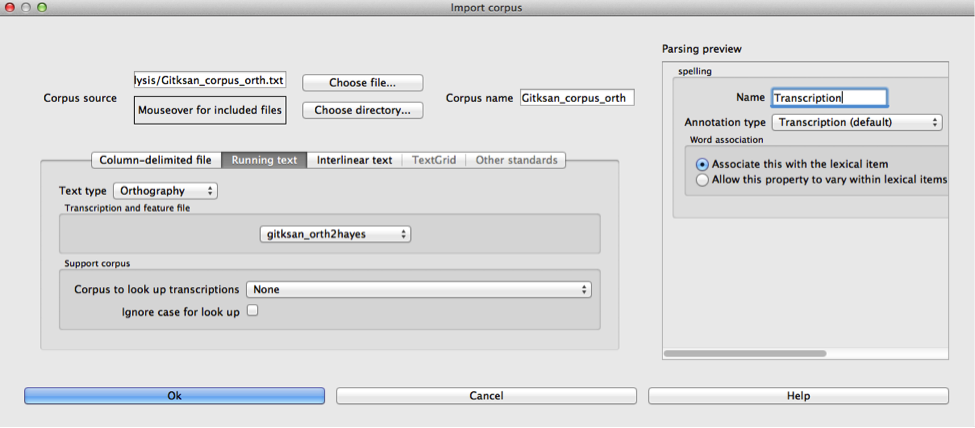
The dialogue boxes for creating the corpus from text. Note that hyphens and equal signs, which delimit morphological boundaries in the original, have been ignored during the read-in. A feature system called gitksan2hayes_delimited, which maps the delimited transcription system used in this example to the features given in [Hayes2009], has already been loaded into PCT (see Using a custom feature system), and so is selected here. In this case, the multicharacter segments are indicated manually.
The resulting corpus, ready for subsequent analysis:

The corpus appears on the left, in the familiar columnar format. The original text of the corpus appears at the right, one word at a time but in their original order. Right-clicking on a word in the corpus list gives you the option to “Find all tokens” in the running text; these words will be highlighted. Similarly, right-clicking a word in the running text gives you the option to “Look up word,” which will highlight the word’s entry in the corpus list.
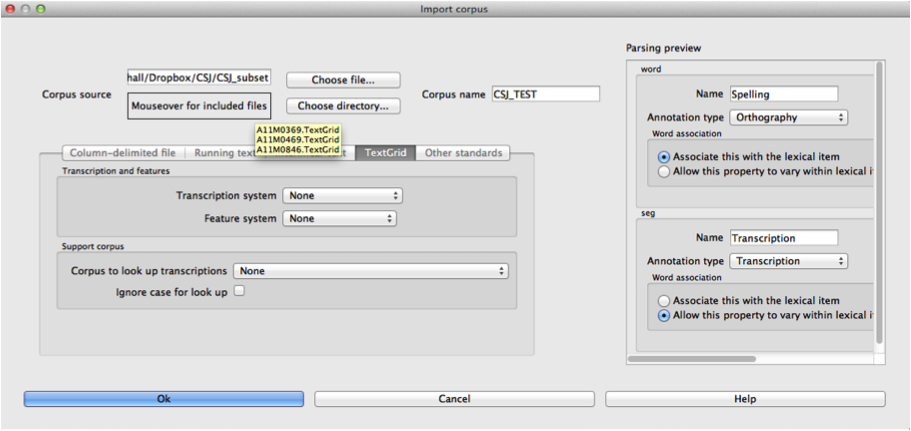
Here is an example of creating a corpus based on three .TextGrid files from the Corpus of Spontaneous Japanese [CSJ]. Note that the hovering over the box labelled “Mouseover for included files” shows a list of the names of the files in the chosen directory. In the “parsing preview” window, each set of boxes corresponds to one tier of the TextGrids, and the original name of the TextGrid is shown at the top (e.g., “word,” “seg”). Note that here, the orthographic tier is associated with the lexical item, while the transcription tier is allowed wot vary within lexical item, such that pronunciation variants are kept track of.
Once the TextGrids have been processed, they appear in a window such as the following. The regular corpus view is in the centre, with frequency counts aggregated over the entire set of speakers / TextGrids. Note that the transcription column may be blank for many words; this is because in spontaneous speech, the citation / spelled words often have multiple different transcribed forms in the corpus itself. To see these various transcriptions, right-click on any word in the corpus and select “List pronunciation variants.” A new dialogue box will pop up that shows the individual pronunciation variants that occur in the corpus for that word, along with their token frequencies. (See also Pronunciation Variants.)
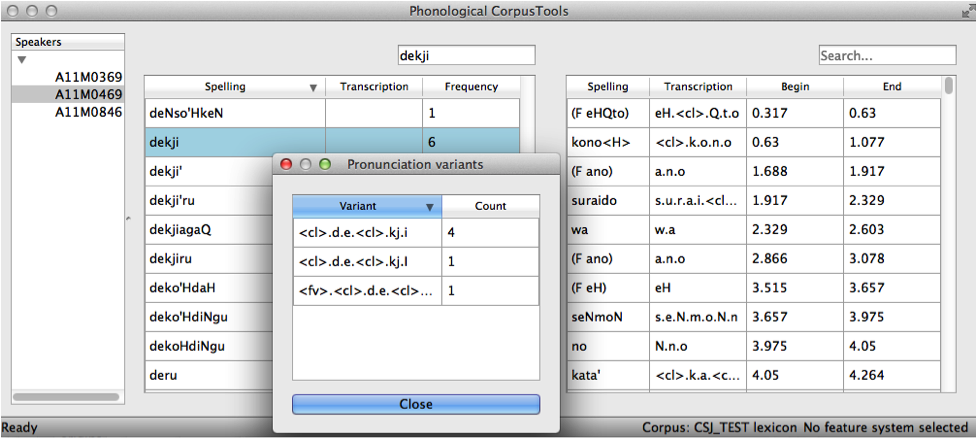
In this example, each TextGrid is interpreted as belonging to a different speaker, and these individual speakers are listed on the left. Clicking on one of the speakers shows the transcript of that speaker’s speech in a box on the right. This is not a corpus, but rather a sequential listing of each word that was extracted, along with the transcription and the timestamp of the beginning of that word in the TextGrid. Right-clicking on a word in this list will give you the option to look up the word’s summary entry in the corpus itself, which apears in the centre. Right-clicking a word in the overall corpus will give you the option to “Find all tokens” of that word in the transcriptions, where they will simply be highlighted.
Creating a corpus file on the command line
In order to create a corpus file on the command line, you must enter a command in the following format into your Terminal:
pct_corpus TEXTFILE FEATUREFILE
…where TEXTFILE is the name of your input text file and FEATUREFILE
is the name of your feature file. You may specify file names using
just the file name itself (plus extension) if your curre nt working
directory contains the files; alternatively, you can specify the full
path to these files. Please do not mix short and full paths.
This script will also look in your Documents directory,
in the same place where the GUI keeps its corpus files:
…Documents/PCT/CorpusTools/CORPUS .
You may also use command line options to change the column delimiter
character or segment delimiter character from their defaults (\t and
'', respectively). Descriptions of these arguments can be viewed by
running pct_corpus -h or pct_corpus --help. The help text from
this command is copied below, augmented with specifications of default values:
Positional arguments:
- -t TRANS_DELIMITER
- --trans_delimiter TRANS_DELIMITER
Character delimiting segments in input file, defaults to the empty string
EXAMPLE:
If your pre-formatted text file is called mytext.txt and your features
are hayes.feature, and if mytext.txt uses ; as column delimiters and .
as segment delimiters, to create a corpus file, you would need to run
the following command:
pct_corpus mytext.txt hayes.feature -d ; -t .
Summary information about a corpus
Phonological CorpusTools allows you to get summary information about your corpus at any time. To do so, go to “Corpus” / “Summary.”
General information: At the top of the “Corpus summary” dialogue box, you’ll see the name of the corpus, the feature system currently being used, and the number of word types (entries) in the corpus.
Inventory: Under the “Inventory” tab, there will generally be three sections, “Consonants,” “Vowels,” and “Other.” (Note that this assumes there is an interpretable feature system being used; if not, then all elements in the inventory will be shown together.) If there is a feature system in place, consonants and vowels will be arranged in a manner similar to an IPA chart. (For more on how to edit this arrangement, see Edit inventory categories.) Any other symbols (e.g., the symbol for a word boundary, #) will be shown under “Other.”
Segments: Clicking on any individual segment in the inventory will display its type and token frequency in the corpus, both in terms of the raw number of occurrences and the percentage of occurrences. Note that the percentages are calculated as follows: First, for any segment X, the number of occurrences of X in words in the corpus is counted (e.g., if the corpus consists of the words ‘mother’ [#mʌðɚ#], ‘father’ [#fɑðɚ#], and ‘mommy’ [#mɑmi#], and X is [m], then it is counted once in the word ‘mother’ and twice in the word ‘mommy’ for a total of 3 occurrences). This number is then relativized to the total number of segments (including word boundaries, which are also included in the summary window) that occur in words in the corpus (e.g. 18 in the three-word corpus of ‘mother,’ ‘father,’ and ‘mommy’ since each word has four phonemes and two word boundaries = 6 segments each), for a type-based percentage of 3/18 = 0.1667 = 16.67%. In the case of token frequency, each occurrence of a segment is multiplied by the frequency of occurrence in the corpus. E.g. if the token frequencies in our mini-corpus example are n = 3 for ‘mother,’ n = 4 for ‘father,’ and n = 7 for ‘mommy,’ then the token frequency of [m] is (1*3) + (2*7) = 17, and the token-based percentage of [m] is 17 / [(3*6) + (4*6) + (7*6)] = 0.2024 = 20.24%.
Columns: Under the “Columns” tab, you can get information about each of the columns in your corpus (including any that you have added as tiers or other columns; see Adding, editing, and removing words, columns, and tiers). The column labels are listed in the drop-down menu. Selecting any column will show you its type (spelling, tier, numeric, factor) and other available information. Tier columns (based on transcriptions) will indicate which segments are included in the tier. Numeric columns will indicate the range of values contained.
Once you are finished examining the summary information, click “Done” to exit.
Subsetting a corpus
It is possible to subset a corpus, creating new corpora that have only a portion of the original corpus. For example, one might want to create a subset of a corpus that contains only words with a frequency greater than 1, or contains only words of a particular part of speech or that are spoken by a particular talker (if such information is available). The new subsetted corpus will be saved and made available to open in PCT as simply a new corpus.
To create a subset, click on “File” / “Generate a corpus subset” and follow these steps:
Name for new corpus: Enter the name for your new corpus. The default is to use the name of the current corpus, followed by “_subset,” but a more informative name (e.g., “Gitksan_nouns”) may be useful.
Filter logic: Choose either “AND” or “OR.” The “AND” option makes multiple filters to be applied cumulative; i.e., the subset corpus will only contain items that pass through ALL filters (rather than, say, one of the filters, or having many subsets, one for each filter). If you want to generate a subset of items that pass any one of the filters, select “OR” here.
Filters: Click on “Add filter” to add a filter that will be used to subset the corpus. You can filter based on any numeric or factor tier / column that is part of your corpus. For a numeric column (e.g., frequency), you can specify that you want words that have values that are equal to, greater than, less than, greater than or equal to, less than or equal to, or not equal to any given value. For a factor column (e.g. an abstract CV skeleton tier), you can add as many or as few levels of the factor as you like. After a filter has been created, you can choose to “Add” it or “Add and create another” filter.
Create subset: Once all filters have been selected, click on “Create subset corpus.” A prompt window “Corpus subset created” will appear, letting you know that the subset corpus is available if you go to “File” / “Load corpus…” – it will automatically be added to your list of available corpora. Note that the subset corpus will automatically contain any additional tiers that were created in your original corpus before subsetting.
Saving and exporting a corpus or feature file
If changes have been made to a corpus (e.g., adding a new tier), you can save them by going to “File” / “Save corpus.” If you attempt to close a corpus that has had changes made to it, without first saving them, the “Overwrite corpus?” dialogue box appears:
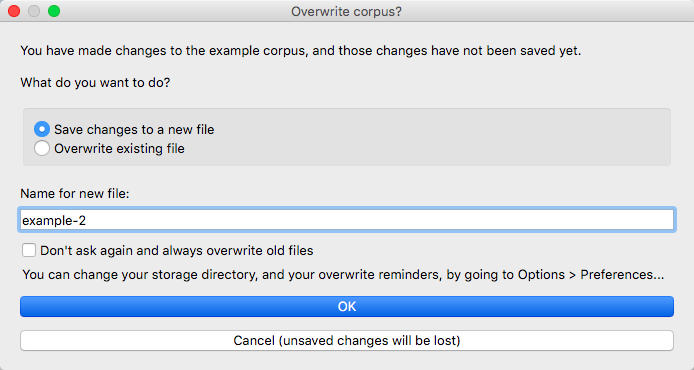
Here you can specify whether the changes should be saved within the corpus, i.e., overwriting the old version of the corpus, or should be saved as a new, separate corpus. The default is to suggest a new corpus name, based on the old one, but you can select “Overwrite existing file” to simply save the changes within the open corpus. You can also select “Don’t ask again and always overwrite old files” to have PCT auto-save changes within a corpus without checking; this setting can be changed at any time in Preferences. If you want to discard the changes entirely and not save them either within the current corpus or in a new version of the corpus, simply click “Cancel.”
It is also possible to export the corpus as a text file (.txt), which can be opened in other software, by selecting “File” / “Export corpus as text file” and entering the file name and location, and the delimiters for column, transcription and syllable (if the corpus has syllables). (Note: use \t to indicate a tab as the delimiter.) You can also choose whether and how to export pronunciation variants, if there are any in the corpus (see Pronunciation Variants and the subsection Exporting Pronunciation Variants: for more details).
Similarly, the feature system can also be exported to a .txt file by selecting “File” / “Export feature system as text file” and selecting the file name and location and the column delimiter. See more about the utility of doing so in Working with transcriptions and feature systems.
See also information about the temporary log file that is created when a new corpus is imported by going to Logging / Saving Parsing Parameters; this file has information about the various Parsing Parameters that were chosen in the creation of any given corpus.
Setting preferences & options; Getting help and updates
Preferences
There are several preferences that can be set in PCT. These can be selected by going to “Options” / “Preferences….” The following are available:
Storage: By default, PCT will save corpus, feature, and result files to your local “Documents” directory, which should exist under the default settings on most computers. When saving a particular output file, you can generally specify the particular storage location as you are saving. However, it is also possible to change the default storage location by changing the file path in this dialogue box. You may enter the path name directly, or select it from a system window by selecting “Choose directory…”.
Display: a. Decimal Places: By default, PCT will display three decimal places in on-screen results tables (e.g., when calculating predictability of distribution or string similarity, etc.). The number of displayed decimal places can be globally changed here. Note that regardless of the number specified here, PCT will save results to files using all of the decimal places it has calculated. b. Wildcard Display: When creating an environment (see Environment Selection), there is an option to include a “wildcard” in any position, which will match any segment in the inventory. The default is for this to display as a single asterisk, but you can change it here to always display the entire set of segments in the inventory if you want to verify what segments are actually being included.
Processing: Some calculations consume rather a lot of computational resources and can be made faster by using multiprocessing. To allow PCT to use multiprocessing on multiple cores when that is possible, select this option and indicate how many cores should be used (enter 0 to have PCT automatically use ¾ of the number of cores available on your machine).
Reminders: By default, PCT will ask before overwriting feature and corpus files. You can change this; unselecting either option will cause PCT to auto-save changes as over-writes to the existing files. See also Saving and exporting a corpus or feature file.
Help and warnings
When using PCT, hovering over a dialogue box within a function will automatically reveal quick ToolTips that give brief information about the various aspects of the function. These can be turned on or off by going to “Options” / “Show tooltips.”
There is also extensive documentation for all aspects of PCT (of which the current text is part). There are several options for accessing this information:
In the main PCT window (i.e., when viewing your corpus), click on “Help” from the “Help” menu. This will take you to the main help file, from which you can navigate to other specific topics.
Go to the online PCT documentation to get access to the help files online.
While working in PCT, most dialogue boxes have options at the lower right-hand corner that say either “Help” or “About…” (e.g., “About functional load…”). Clicking this button will pull up the relevant help file.
Copying and pasting
It is possible to highlight the cells in any table view (a corpus, a results window, etc.) and copy / paste a tab-delimited string version of the data into another program (e.g., a spreadsheet or text editor) using your standard copy & paste keyboard commands (i.e., Ctrl-C and Ctrl-V on a PC; Command-C and Command-V on a Mac).
Updates
To manually see whether there is a more recent version of PCT available for download, click on “Help” / “Check for updates…”.
To be automatically notified of new versions of PCT or any other major news that is relevant to all users, please sign up for the PCT mailing list, available from the PCT website.